

Using “Stable Diffusion” to generate full-body images can sometimes result in facial distortions. To address these distortions, the widely adopted solution is “ADetailer“. This article offers a comprehensive guide to “ADetailer”, covering its installation, features, and best practices. Specifically, you’ll learn:
- How to install and use ADetailer effectively
- Techniques to rectify facial distortions using ADetailer
- Methods to transform expressions and facial features, and the use of LoRA for facial adjustments
- Explanation of parameters and configuration settings
- Recommended prompt to enhance your ADetailer experience
Furthermore, if you are interested in learning about methods to address facial and hand distortions, the following articles can be referred to:
- Stable Diffusion: 8 Techniques for Clearer Faces in Full-Body Photos(kindanai.com)
- Evaluation of 6 Methods for Hand Correction…(kindanai.com)
To access ADetailer, you can visit its GitHub repository: GitHub – Bing-su/adetailer: Auto detecting, masking and inpainting with detection model
- What is ADetailer and How Does It Prevent Deformities in Faces and Hands?
- Benefits of ADetailer: Superiority over other facial correction methods
- Installing ADetailer
- How to Use Adetailer
- Facial transformation using adetailer allows for changes in expression, age, atmosphere, and the application of LoRA specifically to the face.
- Changing facial expressions
- Changing the age
- Transforming the appearance
- Applying LoRA only to the face
What is ADetailer and How Does It Prevent Deformities in Faces and Hands?
ADetailer is a tool designed to correct distortions in faces and hands. The following methods are employed by ADetailer to achieve this correction:
The functionality of ADetailer
- Automatic identification of faces and hands using a detection model.
- The identified sections of the face and hands are cropped and corrected using Stable Diffusion.
- The corrected images of the face and hands are then carefully repositioned into their original locations.
This approach proves to be effective because Stable Diffusion focuses on regenerating the face and hands, resulting in improved outcomes. During the regeneration process, the cropped area has a higher resolution, which allows for detailed rendering of individual features like the eyes and nose, ultimately producing a beautifully depicted face.
Benefits of ADetailer: Superiority over other facial correction methods
ADetailer surpasses other techniques in three key aspects, setting it apart as the preferred choice for facial correction:
- Convenience: Activating the Enable ADetailer option initiates automated facial correction, ensuring a user-friendly and hassle-free experience.
- Memory consumption and generation time optimization: Unlike many other methods that involve upscaling the original image, resulting in larger file sizes and longer processing times, ADetailer focuses solely on the facial image. This approach enables efficient correction without compromising image resolution.
- Flexibility in applying LoRA to the face: ADetailer allows for minor adjustments during the correction process, granting users enhanced flexibility and convenience.
If you would like to explore alternative methods, kindly refer to the article below:
Stable Diffusion: 8 Techniques for Clearer Faces in Full-Body Photos(kindanai.com)
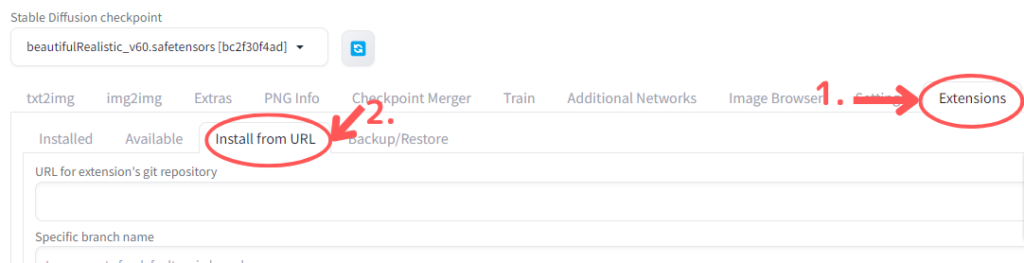
Installing ADetailer
Switch to the “Install from URL” tab(1/4):
- switch the tab from “Stable Diffusion Web UI” to “Extensions”.
- switch to the “Install from URL” tab.
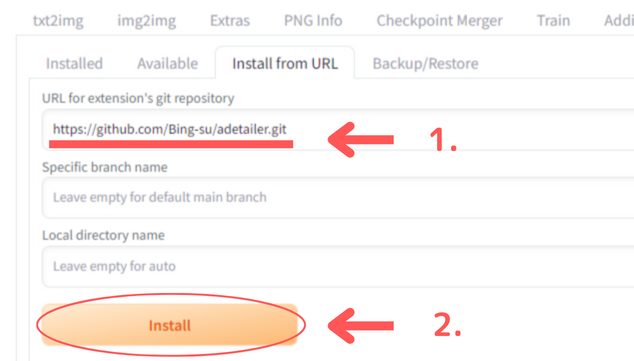
Install Adetailer(2/4):
- Enter the following URL in the “URL for extension’s git repository” field
https://github.com/Bing-su/adetailer.git
- Click on Install to proceed with the installation.
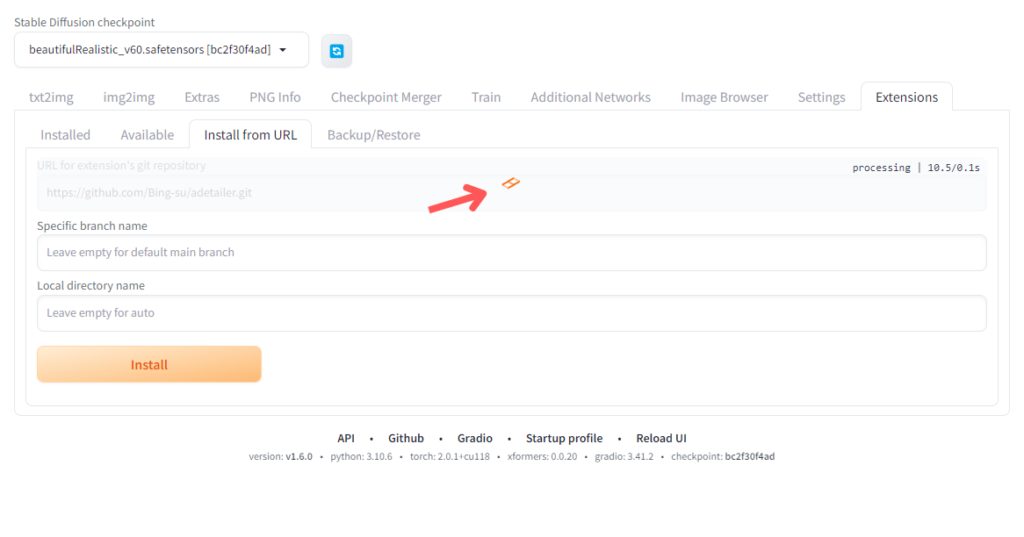
- Wait for the installation to complete. Keep waiting until the loading icon disappears.
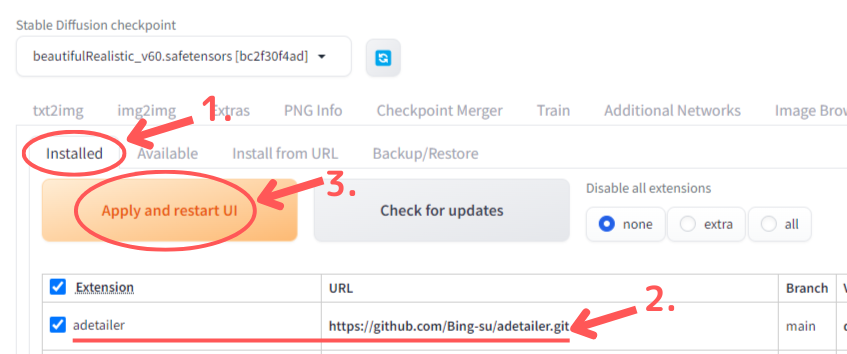
Restart Stable Diffusion Web UI(3/4):
- Switch to the Installed tab.
- Confirm that Adetailer has been installed.
- If everything is okay, restart the Stable Diffusion Web UI by clicking on “Apply and restart UI”.
Confirming Adetailer installation(4/4):
Once the top page is displayed, check if the Adetailer menu has been added.If it appears as shown below, the installation is successful.
How to Use Adetailer
To use ADetailer, you can follow these steps with both txt2img and img2img. For the purposes of this explanation, we will use txt2img.
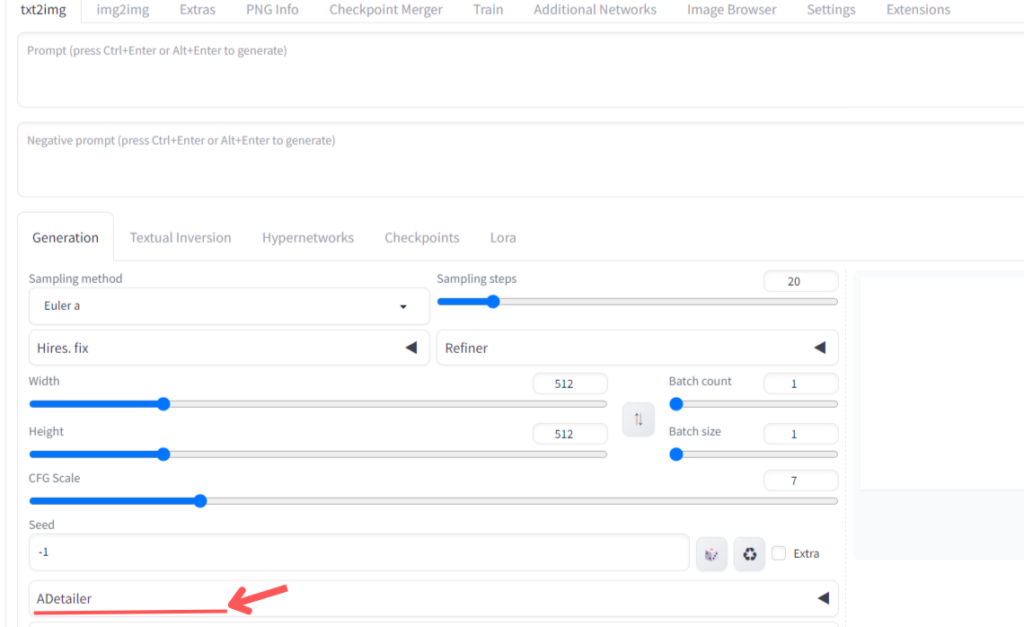
Ensure the ADetailer menu is visible(1/8):
Firstly, check if “ADetailer” is displayed in the lower left corner. If it is not visible, this means it is not installed. Please refer to the previous section for installation instructions.
Open the ADetailer menu(2/8):
Click on the “◀” symbol next to “ADetailer” to open the ADetailer menu.

Enable ADetailer(3/8):
Once the menu is open, make sure to enable the “Enable ADetailer” option. This will activate ADetailer for image generation.

Select an ADetailer model(4/8):
Choose an ADetailer model to use. ADetailer provides models for detecting faces, hands, and bodies. See the table below for details on each model. Select the appropriate model based on the image you want to generate or the specific parts you want to correct (e.g., face, hands, body).

| Model | Target |
|---|---|
| face_yolov8n.pt | Face (Illustration/Real) |
| face_yolov8s.pt | Face (Illustration/Real) |
| hand_yolov8n.pt | Hand (Illustration/Real) |
| person_yolov8n-seg.pt | Person (Illustration/Real) |
| person_yolov8n-seg.pt | Whole Body (Illustration/Real) |
| person_yolov8s-seg.pt | Whole Body (Illustration/Real) |
| person_yolov8s-seg.pt | Whole Body (Illustration/Real) |
| mediapipe_face_full | Face (Real) |
| mediapipe_face_short | Face (Real) |
| mediapipe_face_mesh | Face (Real) |
Input prompts in the ADetailer menu related to the face(5/8):
To proceed, enter the prompts in the ADetailer menu. If left blank, the prompts used during image generation will be utilized. In this case, let’s input prompts that focus on the details of the face. Leave the other parameters at their default values; they will be explained later.
Prompt: (8k, RAW photo, best quality, masterpiece:1.2), (realistic, photo-realistic:1.4), (extremely detailed 8k wallpaper), cheerleader outfit, 20-year-old woman, detailed face
Negative Prompt: EasyNegative, deformed face, ugly, bad face, deformed eyes

Enter prompts for txt2img(6/8):
Now, input the prompts as you normally would for generating an image using txt2img. ADetailer will be applied.
Prompt: (8k, RAW photo, best quality, masterpiece:1.2), (realistic, photo-realistic:1.4), (extremely detailed 8k wallpaper), cheerleader outfit, full body, 20-year-old woman
Negative Prompt: EasyNegative, (worst quality, low quality: 2.0), normal quality, ugly face, unclear eyes, bad mouth, bad anatomy, extra legs, beach, bad anatomy
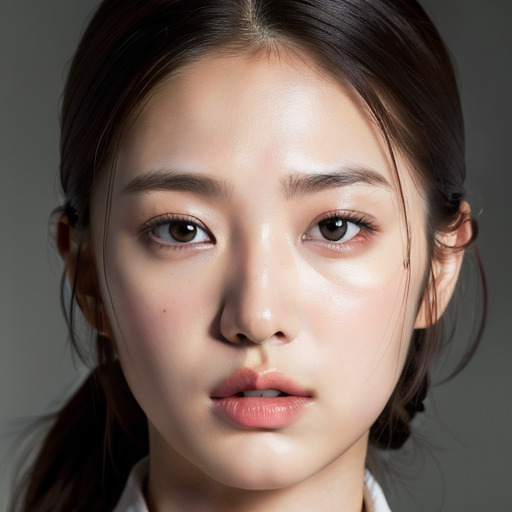
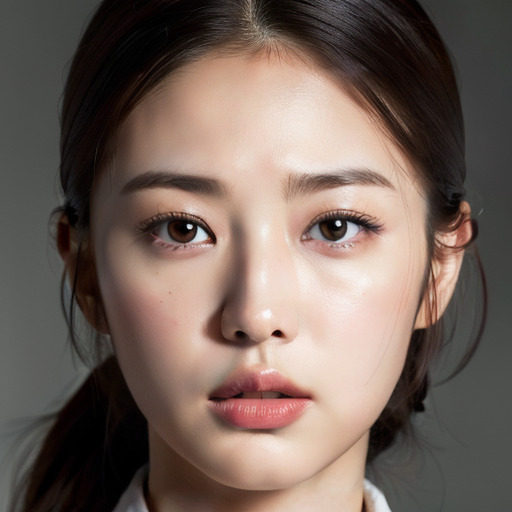
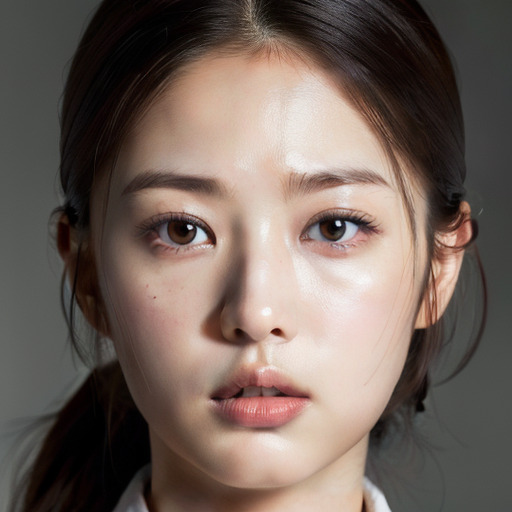
Result(7/8):
The generated result is as follows:

Comparison(8/8):
The left image is without using ADetailer, and the right image is with ADetailer applied. You can observe that ADetailer corrects any distortions in the face.


Facial transformation using adetailer allows for changes in expression, age, atmosphere, and the application of LoRA specifically to the face.
adetailer can be used for more than just fixing distorted faces. Here are some additional uses:
- Changing facial expressions
- Altering the age of a person
- Transforming the appearance to resemble a different race or atmosphere
- Applying LoRA enhancements exclusively to the face
Creating a neutral reference face
To start, let’s generate an expressionless image without using adetailer. Use the following prompt:
- Prompt: (8k, RAW photo, best quality, masterpiece:1.2), (realistic, photo-realistic:1.4), (extremely detailed 8k wallpaper), expressionless, face focus, Photo of a 20-year-old Japanese woman.
Negative Prompt: EasyNegative, (worst quality, low quality: 2.0), normal quality, ugly face, unclear eyes, bad mouth, bad anatomy, extra legs, beach, bad anatomy

Changing facial expressions

Next, let’s use adetailer to transform the neutral image into a smiling face. Input the following prompt:
- Prompt:
(8k, RAW photo, best quality, masterpiece:1.2), (realistic, photo-realistic:1.4), (extremely detailed 8k wallpaper), smile, face focus, Photo of a 20-year-old Japanese woman.
Negative Prompt: EasyNegative, (worst quality, low quality: 2.0), normal quality, ugly face, unclear eyes, bad mouth, bad anatomy, extra legs, beach, bad anatomy


The image has now been transformed into a smile. This demonstrates how adetailer can be used for expression transformations.
Changing the age
adetailer can also change the age of a person. Use the following prompt:
- Prompt:
(8k, RAW photo, best quality, masterpiece:1.2), (realistic, photo-realistic:1.4), (extremely detailed 8k wallpaper), expressionless, face focus, Photo of a 10-year-old Japanese woman.
The left image is the original 20-year-old image, and the right image is the same person with their age changed to 10 years old.


Transforming the appearance
With adetailer, you can even change the person’s appearance to resemble a different race. Let’s transform the face to have a Korean style.
Prompt: (8k, RAW photo, best quality, masterpiece:1.2), (realistic, photo-realistic:1.4), (extremely detailed 8k wallpaper), expressionless, face focus, Photo of a Korean woman.
The left image is the original, and the right image is the result after applying the Korean woman prompt in ADetailer.
Applying LoRA only to the face
You can also apply LoRA enhancements exclusively to the face using ADetailer. If you are new to LoRA, refer to the following article: LoRA Introduction (kindanai.com)
To apply LoRA only to the area around the face and prevent it from affecting the overall image generation, input the following prompt in ADetailer:
Prompt: <lora:hairdetailer:1>,(8k, RAW photo, best quality, masterpiece:1.2), (realistic, photo-realistic:1.4), (extremely detailed 8k wallpaper), expressionless, face focus, Photo of a 20-year-old Japanese woman.
Negative Prompt: EasyNegative, (worst quality, low quality: 2.0), normal quality, ugly face, unclear eyes, bad mouth, bad anatomy, extra legs, beach, bad anatomy

The left image is the original, and the right image is the result after applying LoRA in ADetailer.
I want to specifically convert the facial expression at a later time. I only want to apply LoRA to the face.
If you wish to convert facial expressions or faces using ADetailer in the future, you can achieve facial expression conversion by generating the same image with the same parameters and seed value as when it was originally generated, and then applying ADtailer. To begin, let’s first find the necessary parameters and seed value.
If you find it inconvenient to search for the generated image or are unable to locate it, or if you prefer to perform facial expression conversion on existing images rather than generated ones, I recommend utilizing the ControlNet Inpaint function. If you’re interested, please refer to the following article:How to useControlNet Inpaint: A Comparative Review of Three Processors (kindanai.com)
To retrieve the parameters and seed value of previously created images, you will need to install the Image Browser plugin. Please install the following extension and remember to restart once the installation is complete:
Next, let’s retrieve the parameters and seed.
- Switch to the Image Browser tab.
- Enter keywords in the “EXIF keyword search” field and press Enter to initiate the search. Input a portion of the incantation (prompt) that was specified when generating the image as a keyword.
- Select the desired image.

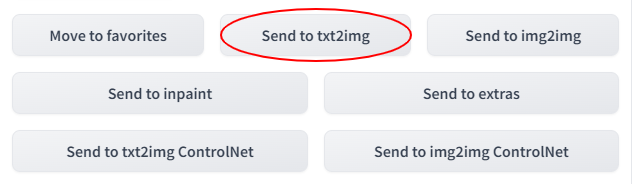
At the bottom right corner, you will find a “Send to txt2img” button. Click on it to proceed.
Once clicked, the screen will transition to the txt2img interface where the parameters will be set. Now, you simply need to generate the image using the same steps as before.
The resulting image is displayed below.
ADetailer Menu Description
Up to 3 ADetailer Applications
With ADetailer, you have the option to run up to 3 models simultaneously. This feature is typically used when you want to correct both the face and the body/hands at the same time.
Face Correction Prompt

Keywords for prompt:
- detailed face
Keywords for negative prompt:
- deformed face
- ugly
- bad face
- deformed eyes
Hand Correction Prompt
Hand correction is achieved using the hand_yolov8n.pt model in ADetailer. This model is specifically designed for detecting hands. To ensure accurate depiction of hands in the prompt, specify this model.

This section lists the prompt that can be used for hand correction/negative prompt:
Keywords for prompt:
five fingers
Keywords for negative prompt:
deformed handextra_fingersbad fingersmissing fingersfewer digits, extra digitliquid fingers
For more detailed explanations, please visit this link.
Body Correction
Body correction is accomplished using the person_yolov8n-seg.pt model in ADetailer. This model is designed for detecting the entire body. To ensure accurate depiction of the body in the prompt, specify this model.

Keywords for negative prompt in body correction:
bad anatomydeformed mutated disfiguredmissing armsextra_arms
Detection
The Detection menu includes parameters related to the detection range of ADetailer.

| Menu | Description |
|---|---|
| Detection model confidence threshold | Only objects with detection model confidence exceeding this threshold will be used for image restoration. Increase this value if there are many false detections. Decrease it if the detection is not working well. |
| Mask min area ratioMask max area ratio | Specify the minimum and maximum areas of the detection region as ratios to the total area of the image. |
Mask Preprocessing
Mask Preprocessing includes parameters for converting the detection range of ADetailer to the application range.

| Mask Preprocessing | Description |
|---|---|
| Mask x, y offset | Adjust the horizontal (x) and vertical (y) position of the mask. This is used to fine-tune the mask’s position. |
| Mask dilation (-) / erosion (+) | Expand or shrink the detected mask. This is used to widen or narrow the application range. |
| Mask merge mode | None: Repair each mask individuallyMerge: Merge all masks for repairMerge and Invert: Merge all masks and invert for repair |
Explanation of the Mask Preprocessing menu in After Detailer (ADetailer)
The sequence of these operations is x, y offset → dilation/erosion → merge/invert.
Inpainting

- Inpainting mask blur: Adjust the degree of blur applied to the mask before inpainting. Increasing the blur can help avoid sharp edges in the inpainted image.
- ADetailer steps: Adjust the number of steps in the inpainting process. Check “Use separate steps” to apply this.
- ADetailer sampler: Select the sampler for inpainting. Check “Use separate sampler” to apply this.
- Restore faces after ADetailer: Apply Restore Faces to the detected range. It will correct the face if the detected range includes a face. This is useful when face inpainting is not working well.
- Inpaint denoising strength: Adjust the strength of denoising in inpainting.
- Inpaint width / height: Resize the detected range to a specified size before applying inpainting. Check “Use separate width/height” to apply this.
- ADetailer CFG scaler: Adjust the CFG Scale in inpainting. Increasing the value will result in more significant changes from the input image, while decreasing it will result in smaller changes. Check “Use separate CFG scale” to apply this.
Regarding the simultaneous use of ControlNet:

If the ControlNet model is installed, it allows for simultaneous use. ControlNet enables the extraction of specific elements, such as body parts, contours, and hand shapes, without modifying them. This extraction process can then be followed by image restoration using Inpaint, while still preserving those extracted elements.
Frequently Asked Questions (FAQ)
Why doesn’t ADetailer appear in the search?
If you’re searching for ADetailer during installation and including it in Stable Diffusion Web UI (AUTO1111), it may not appear because the official name is !After Detailer. In other words, you need to search with “after” or “detailer” to find it.
Is there an alternative to ADetailer?
ADetailer is a mechanism that can correct with high accuracy, but depending on the composition, it may not detect faces or hands. If this is a concern, there are several methods to prevent facial distortion. Please refer to the following article for more information:
Stable Diffusion: 8 Techniques for Clearer Faces in Full-Body Photos (kindanai.com)
About the settings values of ADetailer
When you click on ADetailer in the Settings sidebar of Stable Diffusion Web UI, you can open the ADetailer settings menu.
- Max models: This is the total number of models you want to use. The default is 2. If you want to use multiple models, such as face, hands, and body, you can increase this value. However, typically, face and hands or face and body are sufficient, so you can leave it as it is.
- Save image before ADetailer: This option saves the predicted image of the detection model together with the original image in the same folder.
- Apply only selected scripts to ADetailer: This option saves the image before applying ADetailer in the same folder.
- Apply only selected scripts to ADetailer: This option applies only the specified script to ADetailer. It exists because when used with ADetailer, it may cause errors in some extensions. Make sure to write the name of the Python file, not the name of the extension.
- Apply only selected scripts to ADetailer: This option rearranges the bounding boxes. It is used to control the order in which ADetailer is applied when multiple regions are detected and overlapped. However, this is a rare case, so you don’t need to worry too much.
- None: Random
- Position (left to right): Sort by the left x-coordinate of the bounding box
- Position (left to right): Sort by the proximity of the center of the bounding box to the center of the image
- Position (left to right): Sort by the area of the bounding box (not the area of the mask)
コメント